User Story Mapping
9 min
4+

One of our favourite, but also a quite complex method to go from zero to MVP with your product. User story mapping will help you identify and prioritize user needs.
What is user story mapping?
In a user story mapping workshop you and your team will create a map along your user’s journey through your (future) product or feature. As you will go through the journey, you will break down your user’s tasks into ever smaller pieces until you finally arrived at a level of granularity that is compact enough to work with. The outcome will be a prioritzed backlog of user stories your team can start working on.
It’s an excellent way to break down rough ideas or large epics into precise, actionable items.
You can use story maps for a completely new product or feature. But it’s also possible to use if you just want to restructure your seemingly endless backlog that’s gotten a little mixed up and lost focus after the last few releases.
Depending on how many people take part and how large the project, such a workshop may take more than one day.
You will do story maps ideally with teams of 4–8 people. Make sure to have your designers and developers on board — they can tell you about implementation best practices.
How is a user story map build up?
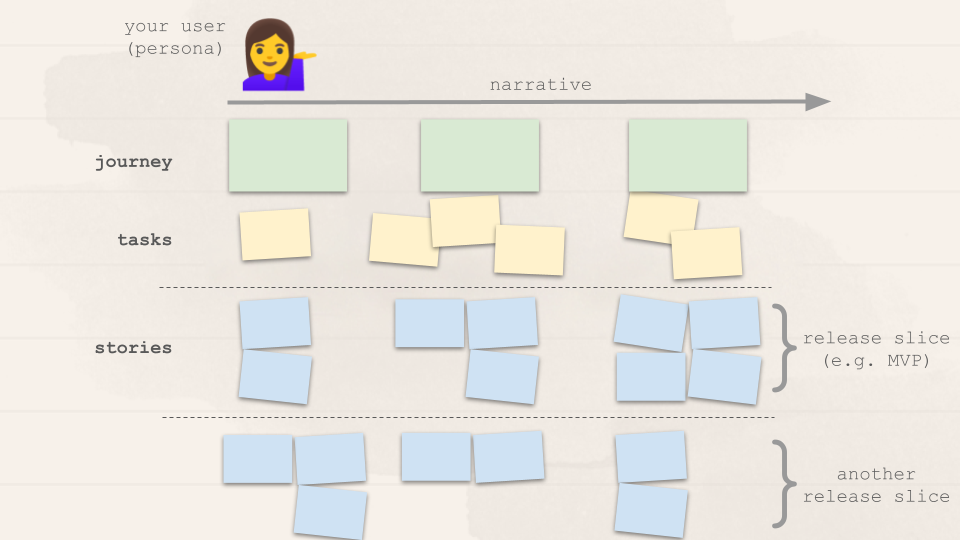
Level 1 consist of journey items. These are on the level of initiatives or large epics. Example of this can include ‘entering your application’ or ‘managing their account’.
Level 2 is made up of user tasks. These are usually epics which break down your initiatives. E.g. before entering your application your user has to find & download you app from the appstore, open it in a secure environment, create and activate an account, log in etc.
Level 3 are then the user stories derived from going into depth on your epics. E.g. for creating an account this could be to set an email, set & confirm a password, provide consent to your terms of use & data privacy and activate their account via email. These do'nt have to be the same level of granularity as the user stories you create in your backlog, but there should be a considerable overlap.
This will make a lot more sense as we go through the process of creating the map.
How to create a user story map in 7 steps
What you need
If you’re doing the workshop remotely, you can use a template from one of the many tools out there such as Miro or Mural.
Otherwise, make sure you got
a large enough room
a whiteboard, flipchart, or a large enough piece of paper to put on the ground.
markers
post-its (lots of them)
coffee —never hurts
Step 1: Frame the journey
Before you start mapping, you want to frame the exercise around a common problem you’re trying to solve. This could be based on your product vision or the goal of a specific feature you’re mapping out.
One of the simplest ways to find this is just to ask: “What does our product do?”
If this feels too big or gets too unwieldy, think about some constraints you can add to your user story mapping session:
What? What problem are you trying to solve? What product do you want to build or what feature do you want to add?
Who? Is there a specific user or user subset you’re building for? What benefits will each of them get from what you’re creating?
Why? What’s the benefit to your company for building this feature or product? How will giving users this add value to the bottom line?
Make sure that everyone is one the same page about what your product has actually done for your user after they used it.
Step 2: Build your story
Alright, with a goal and some constraints (or not!) it’s time to get yourselves into a user’s shoes. Empathize with them and walk through your (future) product from start to finish. Don’t get too detailed. At this point, you want to go wide, not deep.
Ask yourself at each step: “What do I have to do next?” This way, you will complete a user’s journey along the narrative until they reach their goal — the end of your product, basically.
For example, let’s say we’re building a product that helps someone book a vacation home. At the highest level, the steps they take are:
Sign up for an account & log in
Search for vacation homes by city/price/location/availability
View the home profile page
Enter payment information
Book home
Write a review for the homeowner
Make sure to formulate your user journey items as task or goals that your user can fulfill. This will come in handy later. Your product is probably more complicated than that. And so there are a few good ways to help define your user’s journey:
Ask an expert to walk you through the problem step-by-step. How do they tackle this? What steps do they take and what tasks do they perform? Have the rest of the team write these down on sticky notes and place them on the wall in logical order.
Alternatively, if you have multiple experts or the team is familiar with the problem to solve, let everyone write down the steps that need to be taken and put them up on the board. Afterwarrs, get rid of or combine any duplicates.
At the end of this, you’ll have a bunch of steps posted left to right, taking your customer from the start to end of their journey through your product. Take a step back again, see if you missed any necessary steps in between. The otehr way around, if you already want to scope (e.g. for an MVP), take a critical look and see whether any of the steps your identified can be left out.
What if you got multiple personas?
You usually create the story map along the journey of one of your users. In case you have multiple personas, that’s not a problem. Just add missing steps for them afterwards or even in a new map. A story map isn’t a step-by-step guide, but a guide for conversation and planning. Think about the ideal user flow, but know and discuss all the different use cases as they come up.
What if I already got a existing backlog full of user stories?
No worries. Simply write them on a (different coloured) sticky note and pull them into your map. In some cases, this might even be the majority of your steps.
Step 3: Identify and group tasks
Now that you went through a user’s journey, it’s time to dive deeper. Take one of your journey items and ask yourselves: “What does a user have to do to get through this journey item?”
In principle, it’s the same as you did before, just a level below.
For example, if we take the journey item ‘Sign up for an account’ from above, what steps does a user have to go through to make this happen? They could be
Find & download your app from the appstore
Open it (in a secure environment, e.g. if you’re in fin- or health tech)
Areate an account (e.g. with Multi factor authentication)
Activate the account
Log in to your app
Step 4: Break large tasks into stories
If you have done this, it’s now time to go down to the core. At this point, you’ll add cards, split them into two, rewrite and reorganize them. Place user stories underneath their associated tasks and journey items to make clear what goal each one pays into.
Here are a couple suggestions of how to keep your group moving forward from the father of user story mapping, Jeff Patton:
Play “wouldn’t it be cool if…”
Use “blue sky thinking” and go crazy. Don’t let anyone shoot down ideas, no matter how big they are.
Look for variations: What else could your users do at this point? Are there recurring tasks that you need to include? Don’t get stuck in a single lane.
Look for exceptions: What could go wrong and what would a user logically do to try and recover? Look for as many potential issues as possible.
Consider other users: What would a different user do at this point? Being user-centric means thinking about all your users.
Add in other product details: Think about UI elements, data elements, business requirements.
Don’t worry about getting too crazy or writing down ideas that are out of scope. You’ll go through the process of taking them out of scope later on.
Just make sure to not lose the perspective of your user.
Step 5: Fill in the blanks
Before you move on, take a big step back and look for any missing tasks on your map. One great way to test for gaps is to have someone else walk through the narrative or from a different perspective (i.e. a different user persona). While they’re walking through it, have the rest of the team note any situations where you’re missing a step or where their behavior flow is different from what you have and put it up on the board.
It’s also good to get people from different parts of your company to go through this exercise. Another UX designer might tell you where you’re missing steps in the customer journey, while another developer might tell you where a task is too big and needs to be broken down or too risky to implement.
This is also an opportunity to mark pain points or problems in your overall system. Someone walking through might say “this is an issue” where you hadn’t thought of it.
A user story map helps you see how things are now so you can create a better future.
Step 6: Prioritize tasks and subtasks (but leave your narrative as is)
There are many ways to prioritize your map.
For example, ifyou’re building your MVP, simply ask yourselves “is this step really necessary or does it really delight our users?”. If no, leave it to another iteration.
Anotehr way is to prioritize the importance of tasks by moving them up and down under each section. Keep high-priority ones at the top and move ones that are less important lower down.
Another suggestion is to split the map vertically into different sections, such as “Could”, “Should”, and “Must”. This way you can quickly see the tasks that are most important for supporting your core features.
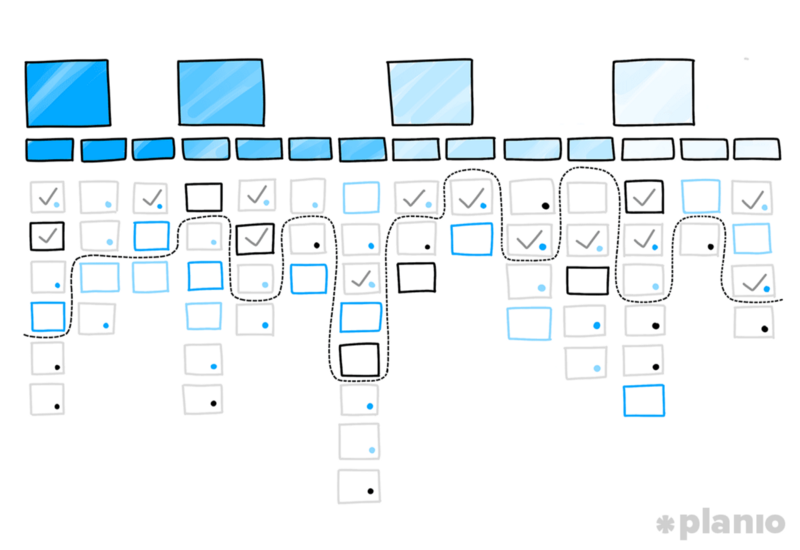
credit for graphic goes to Planio
There are plenty more ways to do this. Just make sure to talk about it with the team before and see which approach suits you best.
Step 7: “Slice” groups of tasks into iterations
Depending on how your prioritzed your user story map — which should be a beast by now — you can just “slice” some of the user stories together into an iteration.
For example, if you decided to prioritize your user map vertically, you can create horizontal “slices” that represent a holistic release. If you’ve prioritized properly, each slice should be a minimum viable product release, creating value across each user and activity.
This approach will probably look a little goofy with lines curving and bending to fit some features and not others, but that’s okay.
Another way — if you’re building a brand new MVP and thought about prioritization while creating the map — is to simply but the post-its that you found shouldn’t be part of the first iteration below the horizontal slice-line (see graphic on top of article).
For each of these slices, name the target outcome and impact. What do you hope to accomplish with this release and how does it help contribute to the overall goal that motivates your company?
You should also identify success metrics. For each slice, ask “what would we measure to determine that this is successful?”. Ideally, your iterations will promote different user behaviors that you can track and test.
And that’s it! As an add-on for small teams who work in one location, try to go old-school: Next to your story map, draw a Kanban or a Sprint Board and just physically move the user stories you work on there. Lots of teams love this as a great addition to using Jira — provides a greater sense of accomplishment.
Got questions, ideas or remarks on this method? Join the conversation on